Application Development
User Control Views
Business rules may require specific functions or fields to be disabled based on the logged in user. Create a User Control page to manage the criteria for a User Control View (UCV), such as if records or fields can be added, edited, deleted or even viewed by a specified user.
While security groups control edit and delete rights to a page, UCVs control these rights at the column level. A single User Control View can control multiple pages in a WebApp if designed correctly and registered to multiple pages.
Refer to Control Views for general information.
Setting up a UCV involves the following steps:
Create the User Control View
UCVs are created in SQL Server. Use the following guidelines, which assume basic knowledge of the Stewardship Tier methodology and SQL Server, to create a UCV:
-
Use the naming convention web*Ucv, where * contains the name of the table assigned to the page, minus the prefix.
NOTE: When controlling multiple pages with a single user control view, Enforce Strict Naming on the WebApps page in the custom WebApp may need to be disabled depending on the naming convention on the view
- Use a UCV when the control status determinations are to be made based on what is known about the user.
- Include the following column aliases in the view:
- boaUserID – Stewardship Tier User ID. The view filters on the current user listed in this column
- boaColumn – technical name of the column on the page
- boaControlStatus – control status: disabled (0), enabled (1) and hidden (2)
boaPageID – (optional) Stewardship Tier Page ID. The view filters on the current page listed in this column
NOTE: To restrict a specific user’s access to update a page, use a UCV to disable Syniti reserved columns, such as
- boaAudit
- boaAdd
- boaUpdate
- boaDelete
Register the User Control View
To register the UCV to a page:
- Select Admin > WebApps in the Navigation pane.
- Click the Pages icon for the desired WEB APP NAME.
- Click Vertical View for the page DESCRIPTION.
- Click Control Views tab.
- Click Edit.
- Select the SQL view from the User Control View list box.
- Click Save.
The following optional processes performed in the custom WebApp allow management of the UCV’s functionality:
- Create a user control table. Refer to Create Tables and Views for Content WebApp Pages Overview for more information.
- Create a user control Horizontal View to manage the criteria. This is a Horizontal view that displays data from the user control table. A user control table allows information to be easily configured, rather than hard coding columns to be disable, enabled or hidden in the UCV. Refer to Guidelines for Horizontal Page Views for more information.
- Assign the custom page to the Configuration Menu. Refer to Add a Menu to the Navigation Pane for more information.
- Create list views for the column properties. Refer to Add List Boxes and Combo Boxes for more information.
Example of a User Control View
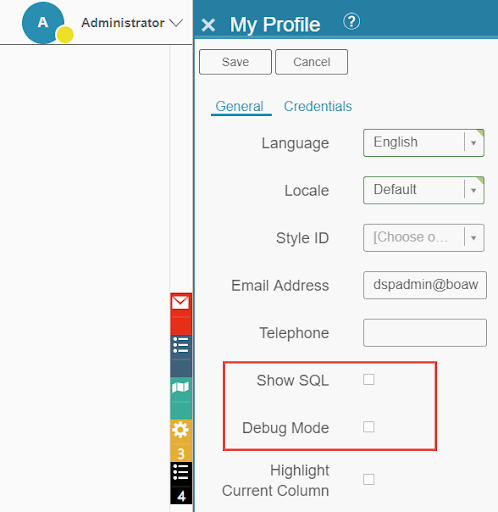
In the following example, a UCV is used to hide fields from specific users. Users in the PowerDesigner security group for the framework (CranSoft WebApp) see two fields on the My Profile page that non-PowerDesigner users do not see: Show SQL and Debug Mode. These fields are hidden by a UCV for non-PowerDesigner users.
NOTE: Users are unable to update Stewardship Tier pages; this is strictly an example.
SQL View
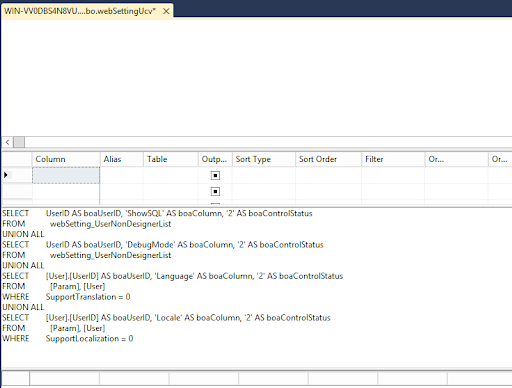
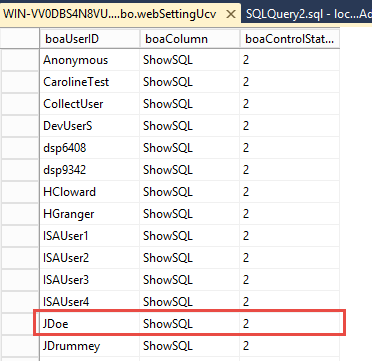
The following is the Results pane from the webSettingUcv where the non-PowerDesigner user, JDoe, appears with a Control Status of “2” as expected (this user sees limited fields on the My Profile page). Since PowerDesigner users are excluded from the webSetting_UserNonDesignerList (used in the webSettingUcv), these users see all possible fields on the My Profile page.
Stewardship Tier Page
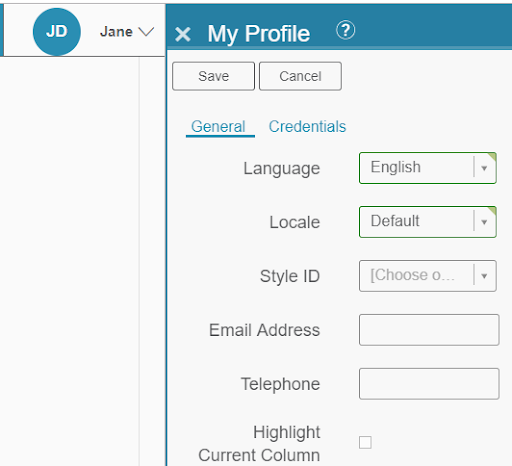
The following image illustrates the fields available on the My Profile page for non-PowerDesigner users:
The following image illustrates the fields available on the My Profile page for PowerDesigner users: