SAP Advanced Data Migration by Syniti Installation Manual 8.0.2
Overview
This help system provides information on the required Roles and Features that must be installed for Syniti Solutions (formerly called DSP) to function as well as installation steps and post installation tasks. Send feedback or information about errors or omissions to ProductDocumentationTeam@Syniti.com.
The success of the installation is heavily dependent on correct environment preparation. The typical environment is a server pair – one server running Microsoft Internet Information Services (IIS) hosting the Syniti Solutions web site and the other server running Microsoft SQL Server hosting the databases. It is possible for the Web Server and Database Server to be the same physical machine. However, this is not supported for production environments.
Refer to the SAP Advanced Data Migration by Syniti Implementation Quick Start Guide for more information.
After the initial installation of the Syniti Solutions, little maintenance from the administrator is required. Ongoing responsibilities include applying periodic updates to Syniti Solutions, monitoring Internet Information Services (IIS) and SQL Server performance and adjusting site parameters. It is also important to check that service pages configured to clear out stale data from database tables are completing successfully and that index maintenance is performed on the databases to avoid performance degradation over time. Some organizations may divide responsibility for IIS, Syniti Solutions and SQL Server administration depending on the organizational structure. This help system focuses primarily on preparing the environment and installing the Syniti Solutions software.
NOTE: SAP Advanced Data Migration software includes the following components:
- Syniti Solutions
- Stewardship Tier (formerly Data Stewardship Platform (DSP))
Exclusions
The installation procedure described in this help system provides detailed steps for a straightforward setup on a company intranet where there is no direct access to the Syniti Solutions server from the public Internet. This is the most common deployment scenario for the Syniti Solutions. In most instances, this help system uses default values that may not be considered sufficiently secure for a publicly accessible web site.
Although there are several references to SQL Server settings required by the Syniti Solutions, this help system does not include guidelines for installing Microsoft SQL Server or for managing, backing up and archiving SQL Server databases. These are local functions defined by corporate policies and procedures.
Relevant Documentation
Before commencing this installation, review these resources:
- SAP Advanced Data Migration by Syniti Implementation Quick Start Guide
- An overview of the installation and configuration procedures to be followed
- SAP Advanced Data Migration by Syniti Software Requirements and Hardware Sizing Guide
- The minimum hardware and software prerequisites that must be in place before installing
- After the installation is successfully completed, perform the steps in the following resources:
The online help is hosted on a Syniti server. To access help, users must be able to navigate to https://dsphelp.syniti.com/*.
Installation Prerequisites
Prior to the installation of the Syniti Solutions, the prerequisites in this section must be satisfied. It is recommended to complete the following sections in order before attempting to install the Syniti Solutions to ensure no required components or settings are missed. The automated nature of the Syniti Solutions setup means that there is no opportunity to fix missing prerequisites during the installation process.
NOTE: If you are upgrading, refer to the Upgrade Overview section for information. If upgrading from a version prior to 6.5 to this version, you must obtain additional product licenses.
Review the SAP Advanced Data Migration by Syniti Software Requirements and Hardware Sizing Guide 8.0.2 section to ensure all required software and hardware requirements have been met, especially the following section.
Windows Server Component Requirements
The following roles and features are required to run the Syniti Solutions on Windows Server. Additional features and roles may be added if desired.
NOTE: IIS components must be installed before the Syniti Solutions setup is run.
Required Roles and Role Services – Windows Server
Web Server (IIS)
- Web Server
- Common HTTP features
- Static Content
- Default Document
- HTTP errors
- HTTP redirection
- Application Development
- .NET extensibility 4.x
- ASP
- ASP.NET 4.x
- ISAPI extensions
- ISAPI filters
- Health and Diagnostics
- HTTP logging
- Request monitor
- Tracing
- Security
- Basic Authentication
- Windows Authentication
- Digest Authentication
- Request Filtering
- Performance
- Static Content Compression
- Common HTTP features
- Management Tools
- IIS Management console
- IIS 6 Management Compatibility
- IIS 6 Metabase compatibility
- IIS 6 WMI compatibility
- IIS scripting tools
- IIS 6 Management console
-
Third-party software
SAP GUI version 7.4.3 Patch Level 8, 7.5.2 Patch Level 10, and 7.6.1 Patch Level 1
- The installation of SAP Data Services Designer Client on the application (web) server is required if working with Data Services Automation. The version must be the same as the Data Services Designer installed in the Data Services server.
This section contains the following topics:
Obtain License
You will be able to apply a 30-day temporary license during the installation, but you should request the permanent license as soon as possible by following these steps:
NOTE: Users must request a new license under the following scenarios:
-
If upgrading from 7.3.1 or below to 8.0.2 to include the Promote component
-
If upgrading to 7.4.6 to include the Entity Validation component
-
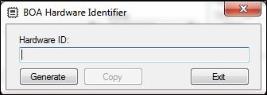
Navigate to the location of the Hardware Identifier program (called “HardwareIdentifier.exe") included in a zip file along with the installation software and documentation downloaded from Syniti.
- Open the program.
-
Click Generate.
Configure Web Browser
The Syniti Solutions is a web browser-based system and has been tested to work with Google Chrome (latest version) and Microsoft Edge; Apple Safari (11) is also supported, though not explicitly certified.
The default settings for most internet browsers meet the requirements for the Syniti Solutions. Cookies must be allowed; JavaScript is used throughout Syniti Solutions and popup windows must not be restricted for the Syniti Solutions site. If problems are experienced accessing the Syniti Solutions web site, relevant settings to enable cookies and JavaScript are usually located in a Privacy or Security section of the browser’s options or preferences settings.
NOTE: Due to browser technology constraints, Syniti Solutions functionality to create BDC Script Integrate templates directly from the Syniti Solutions (Integrate and Mass Maintenance) has been deprecated; however, BDC recordings can still be recorded in SAP and imported into the Syniti Solutions to use this functionality. Additionally, support for the creation of new SAP GUI Integrate templates has been deprecated. Existing GUI Script Integrate templates will continue to work.
Configure SQL Server
Since the Syniti Solutions is running as an Internet Information Services web site, SQL Server authentication must be enabled in SQL Server for the Syniti Solutions to connect to the databases.
To enable SQL Server authentication:
- Open SQL Server Management Studio.
- Connect Object Explorer to the appropriate SQL Server instance.
- Right-click the SQL Server instance.
- Select Properties from the list box.
- Click the Security tab.
-
Verify SQL Server and Windows Authentication mode is selected.
NOTE: When changing the authentication mode, the user may be required to provide a System Administrator (sa) account password.
- If changes were made, restart the SQL Server service by right clicking the instance name and selecting Restart.
Create a SQL Server Login
Once SQL Server authentication is enabled, a SQL Server login must be created. This is the account that the Syniti Solutions uses to log in to the databases.
To create a SQL Server login:
- Open SQL Server Management Studio.
- Connect Object Explorer to the appropriate SQL Server instance.
- Expand the Security folder.
- Right-click Logins.
- Select New Login from the menu.
-
Name the login (for example, DSP).
NOTE: Do not use periods (.) in the login name.
- Select SQL Server Authentication.
- Enter a password in the Password field.
- Re-enter password in the Confirm Password field.
-
Uncheck the Enforce Password Policy checkbox.
NOTE: Disabling Enforce Password Policy prevents the password from expiring. An expired password causes the Syniti Solutions site to become periodically unavailable.
- Click the OK button to create the login.
Configure Default Database File Locations
To optimize usage of disk space and obtain best performance, data files (mdf, ndf) must be located on a dedicated drive array and transaction log files (ldf) should be located on a dedicated drive array, separate to that used for the data files. Several databases are created automatically during installation and their files will be located based on the default settings defined at the SQL Server. By default, SQL Server creates database files under the C:\Program Files\ folder structure, which is not the optimal location. Change these defaults prior to installation.
To configure database default locations:
- Open SQL Server Management Studio.
- Connect Object Explorer to the appropriate SQL Server instance.
- Right-click the SQL Server instance.
- Select Properties from the list box.
- Click the Database Settings tab.
- Under Database Default Locations, configure the desired folder locations for Data and Log files by entering the appropriate folder paths or by browsing to the chosen location (recommended).
- Click OK.
Recommendations for SQL Server Optimizations
Configure settings as follows to tune performance.
Operating System Settings
These settings need to be completed for both the Database server and the Application server.
- Set Power Mode (Control Panel) to "High Performance"
- Open Control Panel > Hardware and Sound > Power Options.
- Click Create a Power Plan to build one selecting High Performance.
- Set System Properties to "Adjust for Best Performance"
- Open Settings > System > About.
- Select Advanced system settings.
- Within System Properties window click select Advanced tab.
- Within Performance section click Settings.
- Within Performance Options window on Visual Effects tab - click to select Adjust for Best Performance.
- Configure PageFile.sys size should be 1.5 * Total Memory and located on SSD if possible
- Open Settings > System > About.
- Select Advanced system settings.
- Within System Properties window click select Advanced tab.
- Within Performance section click Settings.
- Within Performance Options window on Advanced tab.
- Within Virtual Memory section - click Change...
- Within Virtual Memory window - Deselect Automatically manage paging file size for all drives.
- Select Custom Size.
- Populate both Initial and Max with same PageFile size (1.5 * memory).
For SQL Server, add SQL User to Security for Perform Volume Maintenance Task
-
Enter “gpedit.msc” into a run prompt.
-
Go to the following path: Local Computer Policy > Window Settings > Security Settings > User Rights Assignment.
-
Find the “Perform Volume Maintenance Tasks” in the list.
NOTE: If the only group that shows up is “Administrators”, the SQL Server account is missing permissions
AntiVirus Software Exclusions
- SQL Server Log Files: exclude the LOG folder for each SQL instance
- SQL Server DB files: exclude *.MDF, *.LDF, *.NDF
- SQL Trace Files: exclude *.TRC
- Pagefile.sys
- SQL Server Back-up Files (i.e., *.bak, *.trn)
Server level settings
NOTE: To access, right-click Server in SSMS > Properties.
- Set min server memory to 8GB (8192 MB)
- Set max server memory (based on total Operating System reported memory - 4GB
- Set Cost Threshold to 75
- Set Max Degree of Parallelism to 4
- Set Backup Compression to On
Database Level Settings
Configure System Model database using the following settings:
Go to SQL Databases > System Databases > Model > Properties > Files
- Size Each Data File to 512 MB, 512 MB Growth
- Size Log File to 64 MB, 256 MB Growth
- Set Read Committed Snapshot Isolation to True
- Set Recovery Mode to Simple
NOTE: It is important that this step be executed BEFORE the creation of the CranSoft database, and the execution of the DSP install file. A new DB that is created reads these default settings from the Model database, so it avoids incorrect DB settings.
TempDB Optimization
Configure the TempDB system database to these settings, preferably on SSD:
Go to SQL Databases > System Databases > Tempdb > Properties > Files
- 8 Files - Each sized at 8GB (8192 MB), 512 MB Growth
- Log File set to 512 MB, 512 MB Growth
Other SQL Server settings
NOTE: Consult with the Database Administrator for further details.
Go to Programs > SQL Server Configuration Manager > SQL Server Services > right click on SQL Server service > Properties > Startup Parameters > input “-T174” in Specify Startup Parameter > Apply (for each trace flag to add)
- Add Trace Flag -T174.
- Set all User Databases to AUTOGROW_ALL_FILES (Only for SQL 2016 +).
- Set up Weekly Index Maintenance Job.
- Set up Weekly Statistics Rebuild Job (or more often as required).
- Set up Nightly Database Backup Job.
Create an Empty CranSoft Database
To create an empty CranSoft database:
- Open SQL Server Management Studio.
- Expand the tree until the SQL Server instance to which CranSoft connects is visible.
- Right-click Databases folder
- Select New Database from the menu.
- Enter CranSoft in the Name field.
-
Configure non-default data and log file locations, if applicable.
NOTE: Refer to the SAP Advanced Data Migration by Syniti Software Requirements and Hardware Sizing Guide for recommendations on disk structure and file locations.
- Click the OK button to create the database.
NOTE: Other databases required to support the Syniti Solutions are created automatically during the installation process and must not be created manually.
Configure Rights for the Syniti Solutions Login
To add a user to CranSoft database:
- Open SQL Server Management Studio.
- Connect to the database server.
- Expand the Logins branch of the Security folder.
- Select the SQL Server login created for the Syniti Solutions in the Configure SQL Server section.
- Right-click the Login.
- Click Properties.
- Click User Mapping in the vertical menu.
- Click the CranSoft check box under the Users mapped to this login panel.
- Click the db_owner check box under the Database role membership for panel.
- Click Server Roles in the vertical menu.
- Click the db_creator check box under the Server Roles panel.
- Click OK.
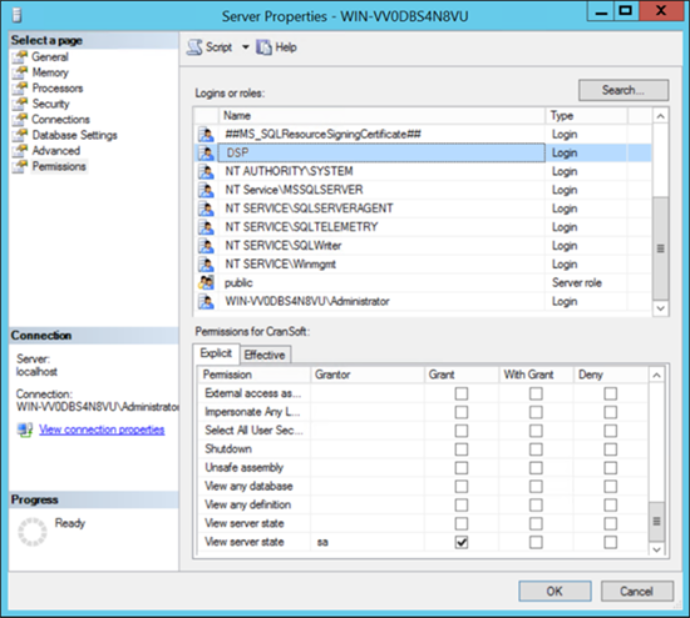
Grant Database Server Permissions to Permit Dashboard Functionality in System Administration
To grant database server permissions:
- In SSMS, right click on Server name > Properties.
- Under Select a page, click Permissions.
- In Logins or roles, select the login used for the Syniti Solutions to connect to the database server.
-
In Permissions for <login>: on the Explicit tab, scroll to View server state, and then click the Grant checkbox.
Before Proceeding with the Syniti Solutions Installation
IMPORTANT: Review the Knowledge Base article Installation Requirements Check Tool to ensure all prerequisites have been met before starting the installation.
Open the Gather Required Information PDF to prepare responses to the install prompts.
If you have Adobe Acrobat installed, you can complete the form fields, save and print this form.
By default, PDF files open in a browser window. You are unable to save the form when using a browser. Refer to How do I open a PDF instead of the browser? for more information.
Install Package Manager and Syniti Solutions
The Syniti Solutions requires a two-part installation process. First, the Package Manager console is installed from a setup.exe. Second, application packages are installed from within the Package Manager console. When the application packages are installed, the web site properties, folder permissions, database connectivity and initial Syniti Solutions service are configured automatically, based on information supplied at install time. After the Package Manager installation is complete, the process of installing the Syniti Solutions will commence automatically.
NOTE: Ensure .NET 4.8 is installed prior to installing the Syniti Solutions. This install may require a system restart.
To install the Package Manager console and initiate the Syniti Solutions installation.
- Copy the SST<Version>FullPackage.exe file to the Web Server.
- Right-click the SST<Version>FullPackage.exe file, select Properties and click the Unblock button, if present.
- Right-click the SST<Version>FullPackage.exe file and select Run as Administrator.
-
Click the Options button to select a folder path for installation. If a path is not specified, Package Manager will be installed to: C:\Program Files (x86) in a \BOA\ sub-directory created by the installer.
NOTE: Do not choose a path that contains more characters than the default path; otherwise, there is the risk of installation packages failing to unzip correctly. It is recommended to choose an installation folder that is either the default location or the root directory of a local drive, for example, C:\ or D:\. The subfolders \BOA\DSP\ will always be created and this step is not configurable.
-
Click the Install button.
NOTE: The Package Manager Console window will open automatically and the Syniti Solutions package installation will commence.
-
Click Close button on the Setup window in the background when the Setup Successful dialog displays.
- Wait while package files are expanded and you are prompted to proceed. This may take several minutes—do not close the console window.
- At Parent Web Site prompt, type: Default Web Site.
- Press the Enter key.
- At Application Name prompt, type the desired virtual directory/application name for the Syniti Solutions installation. Refer to the Before Proceeding with the Stewardship Tier Installation section for detailed information.
- Press the Enter key.
- At Application Pool Name prompt, type the desired IIS application pool name. Refer to the Before Proceeding with the Stewardship Tier Installation section for an explanation.
- Press the Enter key.
- At Server Address prompt, type the SQL Server name, including instance name if applicable, or IP address. Refer to the Before Proceeding with the Stewardship Tier Installation section for an explanation and examples.
- At Database Name prompt, type CranSoft.
- Press the Enter key.
- At the User Name prompt, type the SQL Server login name identified for this instance.
-
At the Password prompt, type the matching password for the SQL Server login specified in the Before Proceeding with the Stewardship Tier Installation section.
NOTE: If the connection information is mistyped or incorrect, a prompt displays to re-enter it.
- At the Password for the Syniti Solutions Administrator user prompt, type the Syniti Solutions Password specified in the Before Proceeding with the Stewardship Tier Installation.
-
At the Repeat Password for the Administrator user prompt, type the Syniti Solutions Password specified in Before Proceeding with the Stewardship Tier Installation.
NOTE: If the passwords do not match, you will be prompted to enter the password again.
- Wait while database contents are loaded and objects created.
- At the Service Name prompt, enter the suffix entered in the Before Proceeding with the Stewardship Tier Installation section that will identify the Syniti Solutions Service.
- Press the Enter key.
Wait while the installation continues. This may take 30 minutes or more. Do not close the Package Manager Console until the installation is complete and the Syniti DR InstallShield Wizard is displayed. If any errors display,
When prompted by the Syniti Data Replication InstallShield Wizard, follow the steps in the following section.
Install Syniti Data Replication for the Syniti Solutions
Syniti Data Replication for Syniti Solutions provides two packages for data replication from Microsoft SQL Server, Oracle, IBM Db2 LUW (or other ODBC-enabled databases) to Microsoft SQL Server:
- Complete data replication (Refresh), followed by regular data updates (Mirroring) of changed data only. This process is valuable in situations where the size of tables does not permit a complete data replication within the allotted time frame.
- Complete data replication (Refresh) using Syniti Data Replication technology. Depending on the environment, this can offer an alternative, more effective, approach to complete data replication.
This section describes how to set up the Syniti Solutions environment to make use of the Syniti Data Replication packages.
Syniti Data Replication for the Syniti Solutions must be installed on the same server. When the Syniti Solutions installation finishes, the 64-bit DBMoto setup file is executed.
NOTE: Ensure .NET Framework v4.8 or higher is installed.
- In the Syniti DR InstallShield Wizard, select the language and click Next.
- Accept the license agreement and click Next.
- Select the Destination Folder and click Next.
- Click the Standard Installation option in the Setup Type window and click Next.
- Click Import in the Customer Information and Setup Options window.
-
Supply the path to the license and click Next.
NOTE: The Syniti Data Replication for the Syniti Solutions license is included in the installation files and may be found at the following location: C:\Program Files (x86)\BOA\DSP\Packaging\Packages\DSP.SynitiDR-7.4.3+39\SynitiDR\SynitiDR_License_Syniti SST_040821.txt
- Check Enable digital signing verification and click Next.
- Click Next on the Start Copying Files window.
Continue with all defaults until you reach the Service Dependencies selection.
NOTE: Use the Syniti Data Replication Service Dependencies window to specify services needed by Syniti Data Replication prior to the Syniti Data Replication Agent startup.
- If the metadata database (see below) is not local (on the same system where Syniti Data Replication is installed), dependencies do not need to be set. Click Finish to close the window.
- If the database that is storing the Syniti Data Replication metadata is local (installed on the same system as Syniti Data Replication), the database must be running before Syniti Data Replication to avoid errors when Syniti Data Replication checks the metadata.
NOTE: To add a dependency, select the service in the list, then click Add. The Synti Data Replication Agent will not start until the selected service has started. For example, if the SQL Server service is selected and Add is clicked, SQL Server is added as a dependency; the Syniti service does not start until the SQL Server service starts.
9. Click Install
At the end of the installation, the Syniti Data Replication Service Monitor program is available in the Windows Notification area (System Tray.) Use this program to start the Replication Agent after creating metadata tables in the Syniti Data Replication Management Center (see below).
-
Click Finish; the Syniti Data Replication Management Center displays.
NOTE: The following steps remove the default Syniti Data Replication metadata and add a specialized Syniti Data Replication for Syniti Solutions metadata so that connections and replications can be set up automatically from the Syniti Solutions.
Next, in the Metadata Explorer:
- Expand the tree, right-click Metadata.
- Select Remove Metadata. A confirmation message displays.
- Check the Drop the metadata tables from the database check box and click Yes.
- Right-click the entry local, and then select Add New Metadata; the Metadata Connection Wizard window displays.
- Click Next.
- Enter DBMoto_Client in Name field.
-
Select Microsoft SQL Server from Database list box.
NOTE: Ensure you select Microsoft SQL Server and do not select Microsoft SQL Server CE.
- Click Next to display the connection parameters.
- Enter the IP address or server name for the installation of SQL Server, which is running the Collect database (a component of the Syniti Solutions) in Data Source field.
- Enter the username that the Syniti Solutions uses in SQL Server (for example, CranSoft) in User ID field.
- Enter the password for that database user in the Password field.
- Click Test to verify the connection settings.
- Click OK to close the message.
- Click Next.
- Select DBMoto_Client from Database Name list box.
- Select dbo from Owner Name list box.
- Click Next to set the metadata.
- Click Create a new metadata database option.
- Click Next.
- Click Yes on the pop-up message.
- Click Next.
- Click Finish.
- Exit the Management Center.
Next, in the Syniti Solutions installation directory:
- Go to the Database\Apps\DataGarage\Components\
Objects\PostInstallSteps subdirectory. Right-click the file DBmoto_in_DataGarage_reference.sql and select Open to execute the contents of the file in the DataGarage database in the SQL Server Management Studio. - In the Syniti Solutions installation directory, under the Web\UserArea\4f3346ca-235a-46bd-84d8-1d234b873a0c\Processes folder, locate and open the DBMoto_Global_Script.txt file. Select all text (Ctrl+A) and copy the text (Ctrl+C). Close the DBMoto_Global_Script.txt file.
- Open the DBMoto Management Center, right-click the new metadata DBMoto_Client, and select Global Script.
- Select VB from the Language drop-down in the Global Script window; a warning message displays.
- Click Yes.
- Select all (Ctrl+A) and delete the text in the Global Script window.
- Copy (Ctrl + C) and paste (Ctrl + V) the text from the DBMoto_Global_Script.txt file into the Global Script window.
- Click the Compile Test button in the bottom left corner and click OK in the Compile Test Successful window.
- Click OK to close the Global Script window.
- Exit the DBMoto Management Center.
-
In Windows, go to Start > Administrative Tools > Internet Information Services (IIS) Manager.
NOTE: There are two types of IIS Managers:
- Internet Information Services (IIS)
- Internet Information Services (IIS) 6.0 Manager
Go to Internet Information Services (IIS), NOT Internet Information Services (IIS) 6.0 Manager.
- Expand the tree to the left and find the application pool under Application Pools.
NOTE: Select the application pool name chosen in the Install Package Manager and Stewardship Tier section
- Right-click the application pool and select Advanced Settings.
- Change the Identity field to LocalSystem, and then click OK.
- Click OK, and then close the manager.
Post Installation Steps
The following post installation steps must be completed for the Syniti Solutions to be fully functional.
-
Create a dedicated Data Services Repository for each installation of the Syniti Solutions that uses Data Services, and create a repository in SAP Business Objects Data Services. This must be a dedicated repository to which no other site connects.
NOTE: For detailed instructions on how to create a Data Services Repository, see the online help topic Set up a Data Services (DS) Repository.
-
If you have a Knowledge Tier tenant, refer to Set Up and Configuration for the Reporting and Metrics Agent.
-
Optionally, update the web.config file to specify how long foreground events run. The default is 90 seconds. If the default is not updated, be aware that there is a possibility of timeouts. To override this default installation setting, update the maximum number of seconds that foreground events should run in the new executionTimeout property in the httpRuntime element in the web.config file in the installation directory. The user could also change specific foreground events to run in the background. Refer to the Foreground Events Time Out after 90 Seconds knowledge base article for more information.
This section contains the following topics:
Change the Site and Service Platform Type
Installations create the site and service to run in 64-bit processes. Refer to Setting the Site and Service Platform Type to 64-bit if these settings must be updated.
Encrypt the Database Connection String
For security reasons, it is important to encrypt the database connection information stored in the web.config file. Perform the following steps to do so:
-
Navigate to the Web\Bin folder in the installation path. This exact path will depend on what was chosen during the initial Package Manager installation. The default location is: C:\Program Files (x86)\BOA\DSP\.
-
Right click the file \Web\bin\CranBerryConfigurator.exe and choose Run As Administrator.
-
NOTE: Depending upon Windows Explorer settings, the file extension may not appear. However, be sure to choose file of Type = Application, not XML configuration.
-
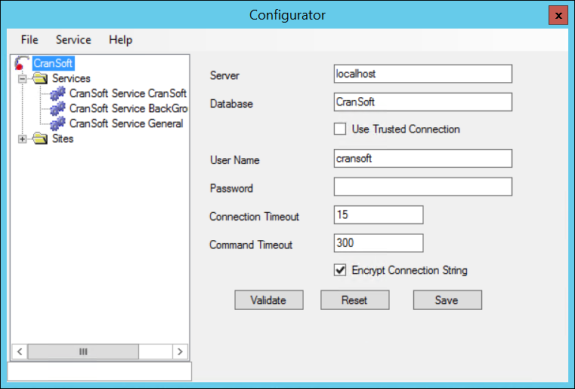
In the Configurator, check the box labeled Encrypt Connection String and click Save button.
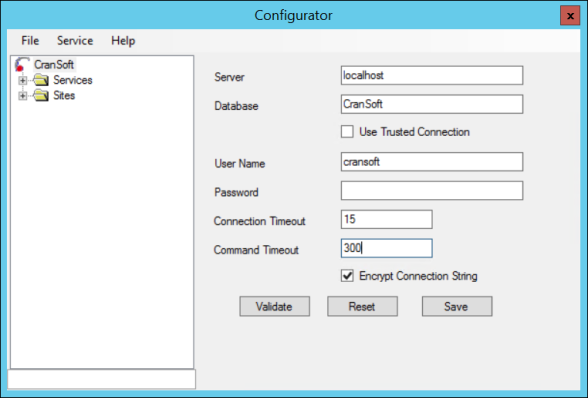
Configurator
-
Confirm that the Changes have been saved dialog appears and click OK button.
-
Choose File > Exit to close the Configurator.
IMPORTANT NOTE: Any person with Administrative rights who can RDP into the web server can open the Configurator application and reset the above setting to false, at which point the connection string will no longer be encrypted. Therefore, it is important to limit access to the SAP Advanced Data Migration web server.
Start the Syniti Solutions Service
The final step of the installation process is to start the Syniti Solutions service created in Install Package Manager and Stewardship Tier section.
To access the Package Manager Console to start the Syniti Solutions service:
-
Click the Start menu, then locate the Cransoft folder.
-
Right-click the Cransoft folder and select More > Show File Location.
-
Right-click the CranSoft Package Manager Console file and select Run as administrator.
-
Type: net start “CranSoft Service suffix.”
NOTE: Where suffix is the service name suffix entered in the Before Proceeding with the Stewardship Tier Installation section. Valid examples include:
- net start “CranSoft Service CS1”
- net start “CranSoft Service DSP”
- Press the Enter key.
NOTE: The Services console under Start Menu > Administrative Tools can also be used to start the service.
Log In to Syniti Site for the First Time and Configure Licensing
Request and Install a 30-day Temporary License
Request a temporary 30-day license during the installation process to start using SAP Advanced Data Migration by Syniti immediately.
NOTE: After installing the temporary license, request a permanent license immediately to avoid an interruption of service.
NOTE: Because licenses are tied to a hardware ID, any hardware change can invalidate your current license. If this occurs, SAP Advanced Data Migration will display the warning below and you will have 14 days to contact the licensing team to obtain a new license before SAP Advanced Data Migration will no longer be accessible. Contact
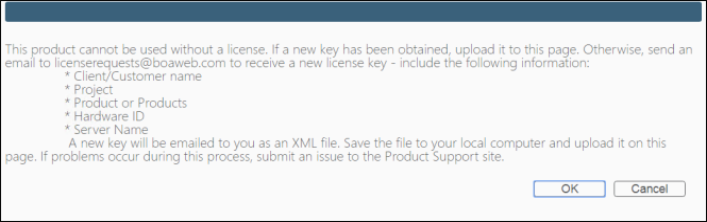
To request and install the temporary license:
-
Log in to Syniti Solutions site as Administrator.
NOTE: Use administrator as the login ID and the Syniti SolutionsAdministrator user password entered while following the steps in Install Package Manager and Syniti Solutions.
- Close the license notification.
- Click the Request Temporary License icon.
- Click Edit.
- Enter Name.
- Enter Company.
- Enter Email Address.
- Click Save.
- Click Submit.
- Click OK.
- Check the email account entered in the Email Address field for the 30-day license.
- Download and save the license.
- Select Admin > Configuration > Product Licenses in the Syniti Solutions.
- Click Upload a New Product License.
- Locate the 30-day license file that was downloaded and saved previously.
- Click Open.
- Verify the license is uploaded.
Request and Install a Permanent License
Contact
To install a permanent license:
- Log in to the Syniti Solutions site as Administrator.
- Select Admin > Configuration > Product Licenses.
- Click Upload a New Product License.
- Locate the permanent license file that was downloaded and saved previously.
- Click Open.
- Verify the license is uploaded.
NOTE: If the Navigation pane does not display all the licensed components as expected, use the browser refresh button or the F5 key to refresh the screen. At this point all licensed components display.
Update Syniti Solutions Parameters
There are numerous parameters available for the Syniti Solutions. For the scope of installation, only a few are required to be populated.
To update the Syniti Solutions parameters in the Syniti Solutions:
- Select Admin > Configuration > Parameters in Navigation pane.
- Click the Site Parameters tab.
- Click Edit.
-
Enter the URL of the server home directory in Web Site Root field, for example, http://webserver.boaweb.com/SST.
-
Enter an SMTP server name in Email Server field and a Default Email Address, if applicable.
NOTE: Complete the Email Server field if workflow emails are to be used within this Syniti Solutions instance.
NOTE: Refer to the article How to Configure Office 365 as the Mail Server for more information about completing the email server fields.
- Click Save.
- Select Mass Maintenance > Configuration > Parameters in the Navigation pane and click the Status icon, ensuring it updates to Procedures Completed. This step validates the record and will ensure that the path for the Mass Maintenance Excel files is accurate.
NOTE: Using a fully qualified domain name in the Web Site Root field can eliminate the need to enter Windows Authentication credentials when clicking on a Workflow link.
To update the domain name:
- In the Syniti Solutions environment where the workflows originate, (for example, //sampleBox/DSPISA/Virtual.aspx), select Admin > Configuration > Parameters in the Navigation pane.
- Enter the fully qualified domain name in the Web Site Root field. For example, replace sampleBox with the fully qualified domain name: sampleBox.rd.syniti.com
- Click Save.
NOTE: This change in the Parameters page only affects new workflows created after the update. Any existing workflow messages that have already been sent will still require the user to enter login credentials.
To update the Syniti Solutions Service Queues in the Syniti Solutions:
- Select Admin > Configuration > Service > Service Providers in the Navigation pane.
- Click Queues icon.
- Update the Priority and Maximum Threads fields for each Queue. The table below can be used as a starting point.
Priority
Queue ID
Maximum Threads
10
Background Events
2
20
General
4
30
Indexing
1
10
Service Pages
5
Install Assemblies
Two assemblies must be manually installed.
To install the assemblies:
-
Navigate to the folder that contains the assemblies.
NOTE: These assemblies are typically located in C:\Program Files (x86)\SAP\FrontEnd\SAPgui\.
- Open a Command Prompt at the folder location.
- Run the following commands as an Administrator:
- regsvr32 sapfewse.ocx
- regsvr32 saprotwr.dll
- Navigate to C:\windows\SysWOW64\ if installing on a 64-bit machine.
- Run the regsvr32 msscript.ocx command.
Set Up and Configure File Paths on the Server
There are several components of the Syniti Solutions that require folders to be created on the Web Server and necessary security granted to these folders. The security access requirements for all folders listed in the table below is the same and requires that the following users have access to read, write, and modify the folders:
- IUSR
- IIS_IUSRS
- LOCAL SERVICE
- NETWORK SERVICE
- The user, if not one of the users listed above, configured to run the Application Pool that hosts the Syniti Solutions.
- The user, if not one of the users listed above, configured to run any CranSoft Service used by the Syniti Solutions.
Create the following folders on the Web server and register the corresponding paths in the proper component of the Syniti Solutions:
|
Component/ Value |
Syniti Solutions Configuration Page | Folder | Description |
| Integrate > Import File Location | Common > Configuration > Modules > Integrate | Import File Location | Path where BDC recording file for import are stored |
| Integrate > Posting Default Folder | Common > Configuration > Modules > Integrate | Posting Default Folder | Default folder for the creation of posting files |
| Integrate > Post File Archive Folder | Common > Configuration > Modules > Integrate | Post File Archive Folder | Folder to serve as the archive location for posting files |
| Collect > DataGarage_SSIS_FilePath | Admin > Data Sources | SSIS File Path | Location where SSIS package are stored |
| Map > cMap_Design_FilePath | Admin > Data Sources | Design File Path | Folder to which all uploaded design documents are stored |
| Transform > DSW_Documentation_FilePath | Admin > Data Sources | Documentation File Path | Folder to which all documentation uploaded via Transform is stored |
| Transform > DSW_Export_FilePath | Admin > Data Sources | Export File Path | Folder to store Export files generated by Transform |
| Transform > DSW_Package_FilePath | Admin > Data Sources | Package File Path | Folder to store Packages generated by Transform |
| Transform > DSW_Report_FilePath | Admin > Data Sources | Report File Path | Folder to store Report files generated by Transform |
| Transform > DSW_Source_FilePath | Admin > Data Sources | Source File Path | Folder to store Source files used by Transform |
| Common > Report Engine FileSystemStore | Common > Configuration > Modules > Report Engine > Report Engine > FileSystem Data Stores | Report File Path | Output of RDIT report files |
For example, the three Integrate folders could be created as shown below:
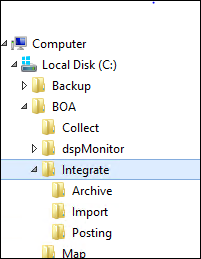
These three Integrate folder locations then need to be registered on the Parameters-Integrate page in Common (Common > Configuration > Modules > Parameters-Integrate).
Performance Note
For large implementations (data downloads of 500 GB or larger) Syniti recommends multiple Syniti Solutions services to split the data downloads and data processing on the Application server.
For large implementations, data downloads 500 GB or larger, Syniti recommends multiple Syniti Solutions services to split the data downloads and data processing on the Application server.
-
Navigate to the \Web\Bin folder in the installation path.
NOTE: The exact path depends on what was chosen during initial Package Manager Installation. The default location is: C:\Program Files (x86)\BOA\DSP\.
-
Right-click the file \Web\bin\CranBerryConfigurator.exe and choose Run as Administrator.
NOTE: Depending upon Windows Explorer settings, the file extension may not appear. However, be sure to choose file of Type = Application, not CONFIG File.
- Click Service > Create Instance, enter General for the Service Name.
- Click Finish.
- Click Service > Create Instance, enter Background Events for the Service Name.
-
Click Finish.
- In the Syniti Solutions, select Admin > Configuration > Service > Service Providers in Navigation pane.
- Add General Queue to the General Service and remove it from the Syniti Solutions Service created during installation.
- Add Background Event Queue to the Background Event Service and remove it from the Syniti Solutions Service
-
Set max threads to 6 for Background Events and 6 for General.
NOTE: The settings may vary depending on the Web App Server CPUs and Memory available.
-
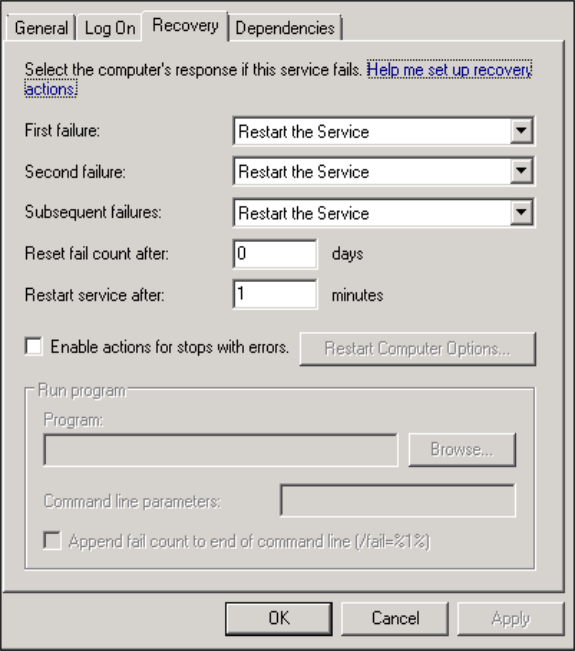
Set each Service to Restart the Service on First, Second and Subsequent failure on the Web App Server Services for CranSoft Service General.
- Click OK.
- Verify that all Syniti Solutionsservices are started.
Additional Syniti Data Replication Settings
Syniti Data Replication can be used as a standalone product or it can be integrated with the Syniti Solutions. If Syniti Data Replication is integrated with the Syniti Solutions, a few additional settings must be configured.
To configure Syniti Data Replication settings in the Syniti Solutions:
- Navigate to Common > Configuration > Modules > Parameters – Collect > SDR Settings tab.
-
Populate all Syniti Data Replication Settings fields. Refer to the following table for a description of each field:
Syniti Data Replication Settings
Description
Server Name
Server name defined in the Syniti Data Replication Management Center, from the Metadata Explorer panel under the DBMoto node (for example, local).
Group Size
Number of tables in each mirroring group. Groups are used to check system logs for changes. It is more efficient to check once for a group of tables than to log in for each table individually. Group Size must be determined by the client. Each group runs in single thread mode with one table refreshing at a time. The default value is 50.
Mirror Interval
For the Mirroring Package type (changed data only), the number of seconds between checking the source database log for changes. As a recommendation, do not use a value less than 60 seconds. The value could be set to 600 so the log can be checked every 10 minutes. The default value is 900.
Start Replicator
If checked, the Syniti Data Replication Agent is started after each Build Package and Refresh Package process. If unchecked, the Syniti Data Replication Agent must be manually started in the Syniti Data Replication Management Center on the application server. This feature is disabled by default.
Enable Group
If checked, allows the group to mirror after each Build Package process. If unchecked, the Enable Group must be manually restarted in the Syniti Data Replication Management Center on the application server. The Syniti Data Replication Agent must be running before the data download process can start. This feature is disabled by default.
Metric Time
Controls when all tables without rules will have the boaDBMotoInd set to zero and the daily change count put in the Metrics process. The default value is the date and time that Syniti was installed.
- In Collect, add Target and Target Source.
-
In the Syniti Data Replication Metadata Explorer, add connections for source databases as needed. Note that the source name in Syniti Data Replication must match the target source name in the Collect component of the Syniti Solutions, including case.
-
In the Metadata Explorer of Syniti Data Replication, add connections for target databases as needed. However, do not enable Transactional Replication for target databases. The target name in Syniti Data Replication must match the target name in the Collect component of the Syniti Solutions, including case.
Refer to the following documents available on request by opening a Support message via
Oracle
Create source connections in the Syniti Data Replication Management Center with names that match the Sources created in the Collect component of the Syniti Solutions. Refer to the How to Create Syniti Data Replication Source Connections section. Review the Setup Notes for Oracle Transactional Replications in the Help Center for information on required database permissions and settings for Oracle database.
Microsoft SQL Server
Create source connections in the Syniti Data Replication Management Center with names that match the Sources created in the Collect component of the Syniti Solutions. Refer to the How to Create Syniti Data Replication Source Connections section. Review the Setup Notes for Microsoft SQL Server Transactional Replications in the (Help Center) for information on required database permissions and settings for Microsoft SQL Server.
IBM DB2 LUW
Create source connections in the Syniti Data Replication Management Center with names that match the Sources created in the Collect component of Syniti Solutions. Refer to the How to Create Syniti Data Replication Source Connections section. Review the Setup Notes for IBM Db2 LUW Transactional Replications in the Help Center for information on required database permissions and settings for IBM DB2 LUW.
Other databases with ODBC, OLE DB or .NET Provider access
- Build the DBMoto package in the Collect component of the Syniti Solutions.
- Log in to Collect.
- Click Targets.
- Select the desired target and click the Sources icon.
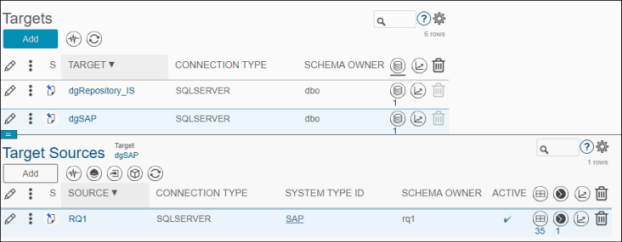
- Click the Table icon for the Target Source.
- Verify that the target and source in the Collect component of the Syniti Solutions have the same names as in Syniti Data Replication (case-sensitive).
- Click Build Package.
If Syniti Data Replication for the Syniti Solutions was installed correctly and the default settings for the DBMoto package are used, the data replication process runs automatically. For further assistance with installing and setting up Syniti Data Replication for the Syniti Solutions,
How to Create Syniti Data Replication Source Connections
Microsoft SQL Server, Oracle and IBM DB2 LUW are supported as source databases. If using another database, check that the database and version is supported by submitting an issue to
To create Syniti Data Replication source connections for databases:
- In the Metadata Explorer, expand the DBMoto_Client.metadata.
- Right-click Sources and select Add New Connection.
- In the Source Connection wizard, set values that match the connection specified in the Collect component of the Syniti Solutions on the Target Source (Setup) page. Refer to the documents listed in the Syniti Data Replication Connection Documentation table.
- Complete the wizard and check that the connection has been created in the Metadata Explorer.
- Create additional connections as needed.
- Create Target Connection.
Syniti Data Replication Troubleshooting
If problems arise when building or refreshing DBMotoDownload or DBMotoMirror packages in the Collect component of the Syniti Solutions, verify the following items:
- The Syniti Data Replication metadata is stored in a SQLServer database, with the following name for the database object: DBMoto_Client.
- Connection names defined in the Syniti Data Replication metadata (using the Management Center) are the same for the Data Source used in the Collect component of the Syniti Solutions.
- To use the mirroring package, the transactional log settings are configured in the source connection properties, from the Management Center. The configuration depends on the database type of the connection. Refer to the specific setup guide for privileges and database settings.
- Syniti Data Replication Agent and Server Agent are installed.
- Syniti Data Replication Server Agent is running.
- The identity in the Syniti Solutions Application Pool is Local System.
- Syniti Solutions service and IIS were reset before trying to use Syniti Data Replication for the Syniti Solutions.
- The DBMoto setting defined in the Collect component of the Syniti Solutions has the following entry to refer to the dbmoto server: ServerName=<NameOfTheServerDefinedInManagementCenter>.